现象描述
pod一直处于terminating状态,或者很久才能删除,内核日志中持续打印unregister_netdevice: waiting for XXX to become free. Usage count = 1。
故障诊断
经过定位和排查,定位到是内核的一个bug导致网络设备无法删除。具体参考https://github.com/torvalds/linux/commit/ee60ad219f5c7c4fb2f047f88037770063ef785f。
另外在github的k8s的issues里也有该bug的相关讨论。有人给出了付现这个问题的方式,以及验证上面提到的修复方法是否有效。下面是按照他给出的方案做的复现和验证。具体可参考https://github.com/moby/moby/issues/5618#issuecomment-549333485。
问题排查
从kubelet内核日志来看是在删除pod的网卡设备时因为内核的引用计数bug,导致无法删除。后续对网卡信息的查询和再次删除操作应该也会导致超时失败(根据日志推断,暂时还未在代码中找到对应调用,线上环境也没法重启调整日志级别和调试)。
首先需要看一个概念:PLEG。
PLEG (pod lifecycle event generator) 是 kubelet 中一个非常重要的模块,它主要完成以下几个目标:
- 从 runtime 中获取 pod 当前状态,产生 pod lifecycle events
- 从 runtime 中获取 pod 当前状态,更新 kubelet pod cache
接下来分析一下造成问题的原因应该是k8s的PLEG在同步pod信息时,可能要查询网卡详情(ip地址),由于内核bug导致超时,致使syncLoop中每执行一次遍历的时间过长(4分钟左右),因此新建pod和删除pod的时候,node上的信息和server上的信息更新不及时。用busybox测试创建和删除时,通过docker ps可以看到响应容器很快就可以启动或删除掉。
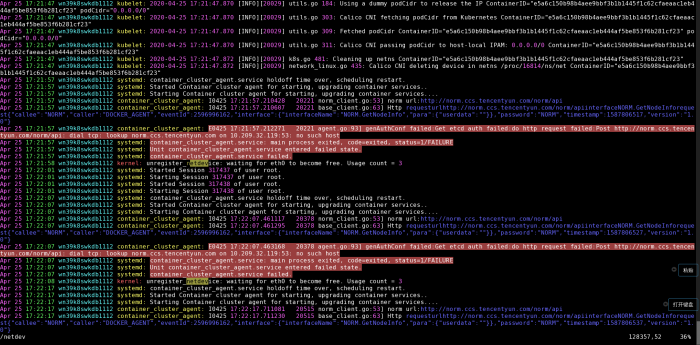
从图中可以看到该日志:Calico CNI deleting device in netns /proc/16814/ns/net这条。这是在pod执行删除是产生的。在正常情况下后面会有删除完成的日志信息,如下图:

但上面的日志里的无此信息,并且10s后打印了unregister_netdevice xxx的日志。这里是触发了内核bug。通过ps aux | grep calico也可以看到在对应时间有一个calico进程启动去执行操作,目前这个进程还在(10.209.33.105),这里估计k8s也有bug,没有wait pid,导致calico成为僵尸进程。

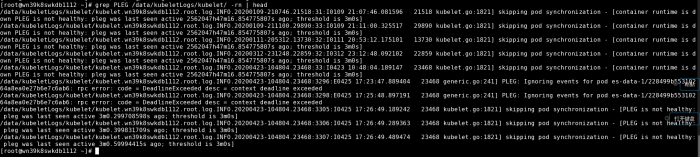
下图是kubelet日志。其中的PLEG is not healthy日志也是在对应的时间点出现。
问题本地复现
要在本地复现这个问题,首先需要给内核打补丁来协助复现。
diff --git a/net/ipv4/route.c b/net/ipv4/route.c
index a0163c5..6b9e7ee 100644
--- a/net/ipv4/route.c
+++ b/net/ipv4/route.c
@@ -133,6 +133,8 @@

 static int ip_min_valid_pmtu __read_mostly	= IPV4_MIN_MTU;

+static int ref_leak_test;
+
/*
  *	Interface to generic destination cache.
  */
@@ -1599,6 +1601,9 @@ static void ip_del_fnhe(struct fib_nh *nh, __be32 daddr)
 	fnhe = rcu_dereference_protected(*fnhe_p, lockdep_is_held(&fnhe_lock));
	while (fnhe) {
 		if (fnhe->fnhe_daddr == daddr) {
+			if (ref_leak_test)
+				pr_info("XXX pid: %d, %s: fib_nh:%p, fnhe:%p, daddr:%x\n",
+					current->pid,  __func__, nh, fnhe, daddr);
 			rcu_assign_pointer(*fnhe_p, rcu_dereference_protected(
 				fnhe->fnhe_next, lockdep_is_held(&fnhe_lock)));
 			fnhe_flush_routes(fnhe);
@@ -2145,10 +2150,14 @@ static struct rtable *__mkroute_output(const struct fib_result *res,

		fnhe = find_exception(nh, fl4->daddr);
 		if (fnhe) {
+			if (ref_leak_test)
+				pr_info("XXX pid: %d, found fnhe :%p\n", current->pid, fnhe);
 			prth = &fnhe->fnhe_rth_output;
 			rth = rcu_dereference(*prth);
 			if (rth && rth->dst.expires &&
`			    time_after(jiffies, rth->dst.expires)) {
+				if (ref_leak_test)
+					pr_info("eXX pid: %d, del fnhe :%p\n", current->pid, fnhe);
				ip_del_fnhe(nh, fl4->daddr);
 				fnhe = NULL;
 			} else {
@@ -2204,6 +2213,14 @@ static struct rtable *__mkroute_output(const struct fib_result *res,
 #endif
 	}

+	if (fnhe && ref_leak_test) {
+		unsigned long  time_out;
+
+		time_out = jiffies + ref_leak_test;
+		while (time_before(jiffies, time_out))
+			cpu_relax();
+		pr_info("XXX pid: %d, reuse fnhe :%p\n", current->pid, fnhe);
+	}
 	rt_set_nexthop(rth, fl4->daddr, res, fnhe, fi, type, 0);
 	if (lwtunnel_output_redirect(rth->dst.lwtstate))
 		rth->dst.output = lwtunnel_output;
@@ -2733,6 +2750,13 @@ static int ipv4_sysctl_rtcache_flush(struct ctl_table *__ctl, int write,
		.proc_handler	= proc_dointvec,
	},
 	{
+		.procname	= "ref_leak_test",
+		.data		= &ref_leak_test,
+		.maxlen		= sizeof(int),
+		.mode		= 0644,
+		.proc_handler	= proc_dointvec,
+	},
+	{
		.procname	= "max_size",
		.data		= &ip_rt_max_size,
.maxlen = sizeof(int),编译内核的详细步骤参考:https://wiki.centos.org/zh/HowTos/Custom_Kernel
添加用户useradd kernel-build
下载内核源码kernel-3.10.0-693.el7.src.rpm,拷贝到/home/kernel-build,并切换到kernel-build用户。
执行rpm -i kernel-3.10.0-693.el7.src.rpm | grep -v exist解压源码包。
进入cd /home/kernel-build/rpmbuild目录。
修改rpm打包文件vim SPECS/kernel.spec,添加patch说明。
ApplyOptionalPatch netdev-leak.patch
编辑并生成patch文件,保存到SOURCES/netdev-leak.patch,其内容为:
--- a/net/ipv4/route.c	2017-07-07 07:37:46.000000000 +0800
+++ b/net/ipv4/route.c	2020-05-06 17:33:19.746187091 +0800
@@ -129,6 +129,7 @@
 static int ip_rt_min_advmss __read_mostly	= 256;

 static int ip_rt_gc_timeout __read_mostly	= RT_GC_TIMEOUT;
+static int ref_leak_test;
 /*
  *	Interface to generic destination cache.
  */
@@ -1560,8 +1561,15 @@
 	fnhe = rcu_dereference_protected(*fnhe_p, lockdep_is_held(&fnhe_lock));
 	while (fnhe) {
 		if (fnhe->fnhe_daddr == daddr) {
+			if (ref_leak_test)
+				pr_info("XXX pid: %d, %s: fib_nh:%p, fnhe:%p, daddr:%x\n",
+					current->pid,  __func__, nh, fnhe, daddr);
 			rcu_assign_pointer(*fnhe_p, rcu_dereference_protected(
 				fnhe->fnhe_next, lockdep_is_held(&fnhe_lock)));
+			/* set fnhe_daddr to 0 to ensure it won't bind with
+  			 * new dsts in rt_bind_exception().
+ 			 */
+			// fnhe->fnhe_daddr = 0; 这行是修复代码,复现问题的时候不需要,注释掉
 			fnhe_flush_routes(fnhe);
 			kfree_rcu(fnhe, rcu);
 			break;
@@ -2054,10 +2062,14 @@

 		fnhe = find_exception(nh, fl4->daddr);
 		if (fnhe) {
+			if (ref_leak_test)
+				pr_info("XXX pid: %d, found fnhe :%p\n", current->pid, fnhe);
 			prth = &fnhe->fnhe_rth_output;
 			rth = rcu_dereference(*prth);
 			if (rth && rth->dst.expires &&
 			    time_after(jiffies, rth->dst.expires)) {
+				if (ref_leak_test)
+					pr_info("eXX pid: %d, del fnhe :%p\n", current->pid, fnhe);
 				ip_del_fnhe(nh, fl4->daddr);
 				fnhe = NULL;
 			} else {
@@ -2122,6 +2134,14 @@
 #endif
 	}

+	if (fnhe && ref_leak_test) {
+		unsigned long  time_out;
+
+		time_out = jiffies + ref_leak_test;
+		while (time_before(jiffies, time_out))
+			cpu_relax();
+		pr_info("XXX pid: %d, reuse fnhe :%p\n", current->pid, fnhe);
+	}
 	rt_set_nexthop(rth, fl4->daddr, res, fnhe, fi, type, 0);
 	if (lwtunnel_output_redirect(rth->dst.lwtstate))
 		rth->dst.output = lwtunnel_output;
@@ -2661,6 +2681,13 @@
 		.maxlen		= sizeof(int),
 		.mode		= 0644,
 		.proc_handler	= proc_dointvec,
+	},
+	{
+		.procname	= "ref_leak_test",
+		.data		= &ref_leak_test,
+		.maxlen		= sizeof(int),
+		.mode		= 0644,
+		.proc_handler	= proc_dointvec,
 	},
 	{
 		.procname	= "max_size",
执行rpmbuild -bb –target=`uname -m` SPECS/kernel.spec 2> build-err.log | tee build-out.log
安装新内:
yum localinstall RPMS/x86_64/kernel-3.10.0-693.el7.centos.x86_64.rpm
编辑ref_leak_test_begin.sh
#!/bin/bash

# constructing a basic network with netns
# client <-->gateway <--> server
ip netns add svr
ip netns add gw
ip netns add cli

ip netns exec gw sysctl net.ipv4.ip_forward=1

ip link add svr-veth type veth peer name svrgw-veth
ip link add cli-veth type veth peer name cligw-veth

ip link set svr-veth netns svr
ip link set svrgw-veth netns gw
ip link set cligw-veth netns gw
ip link set cli-veth netns cli

ip netns exec svr ifconfig svr-veth 192.168.123.1
ip netns exec gw ifconfig svrgw-veth 192.168.123.254
ip netns exec gw ifconfig cligw-veth 10.0.123.254
ip netns exec cli ifconfig cli-veth 10.0.123.1

ip netns exec cli route add default gw 10.0.123.254
ip netns exec svr route add default gw 192.168.123.254

# constructing concurrently accessed scenes with nerperf
nohup ip netns exec svr  netserver -L 192.168.123.1

nohup ip netns exec cli  netperf -H 192.168.123.1 -l 300 &
nohup ip netns exec cli  netperf -H 192.168.123.1 -l 300 &
nohup ip netns exec cli  netperf -H 192.168.123.1 -l 300 &
nohup ip netns exec cli  netperf -H 192.168.123.1 -l 300 &

# Add delay
echo 3000 > /proc/sys/net/ipv4/route/ref_leak_test

# making PMTU discovery exception routes
echo 1 >  /proc/sys/net/ipv4/route/mtu_expires
for((i=1;i<=60;i++));
do
  for j in 1400  1300 1100 1000
  do
	echo "set mtu to "$j;
	ip netns exec svr ifconfig  svr-veth  mtu $j;
	ip netns exec cli ifconfig  cli-veth  mtu $j;
	ip netns exec gw ifconfig svrgw-veth  mtu $j;
	ip netns exec gw ifconfig cligw-veth  mtu $j;
	sleep 2;
  done
done
编辑ref_leak_test_end.sh
#!/bin/bash

echo 0 > /proc/sys/net/ipv4/route/ref_leak_test

pkill netserver
pkill netperf

ip netns exec cli ifconfig cli-veth down
ip netns exec gw ifconfig svrgw-veth down
ip netns exec gw ifconfig cligw-veth down
ip netns exec svr ifconfig svr-veth down

ip netns del svr
ip netns del gw
ip netns del cli
执行测试,首先执行bash ref_leak_test_begin.sh,等待数秒至一分钟时间。Ctrl + C结束,执行bash ref_leak_test_end.sh。大概在10秒钟之内会打印下列信息:
[root@VM_1_72_centos ~]# bash ref_leak_test_begin.sh
net.ipv4.ip_forward = 1
nohup: 忽略输入并把输出追加到"nohup.out"
nohup: 把输出追加到"nohup.out"
nohup: 把输出追加到"nohup.out"
set mtu to 1400
nohup: 把输出追加到"nohup.out"
nohup: 把输出追加到"nohup.out"
set mtu to 1300
set mtu to 1100
set mtu to 1000
set mtu to 1400
set mtu to 1300
^C^C
[root@VM_1_72_centos ~]# bash ref_leak_test_end.sh
[root@VM_1_72_centos ~]# ip netns list
Message from syslogd@VM_1_72_centos at May  6 17:43:49 ...
 kernel:unregister_netdevice: waiting for cli-veth to become free. Usage count = 1

[root@VM_1_72_centos ~]# ip netns list
[root@VM_1_72_centos ~]#
Message from syslogd@VM_1_72_centos at May  6 17:43:59 ...
 kernel:unregister_netdevice: waiting for cli-veth to become free. Usage count = 1

Message from syslogd@VM_1_72_centos at May  6 17:44:09 ...
 kernel:unregister_netdevice: waiting for cli-veth to become free. Usage count = 1

Message from syslogd@VM_1_72_centos at May  6 17:44:19 ...
 kernel:unregister_netdevice: waiting for cli-veth to become free. Usage count = 1

Message from syslogd@VM_1_72_centos at May  6 17:44:29 ...
 kernel:unregister_netdevice: waiting for cli-veth to become free. Usage count = 1
现在可以复现出unregister_netdevice: waiting for XXX to become free. Usage count = 1的问题。
修复和验证
问题修复的patch是修改内核代码net/ipv4/route.c中的下列内容:
@@ -1303,6 +1303,10 @@ static void ip_del_fnhe(struct fib_nh *nh, __be32 daddr)
		if (fnhe->fnhe_daddr == daddr) {
			rcu_assign_pointer(*fnhe_p, rcu_dereference_protected(
				fnhe->fnhe_next, lockdep_is_held(&fnhe_lock)));
			/* set fnhe_daddr to 0 to ensure it won't bind with
			 * new dsts in rt_bind_exception().
			 */
			fnhe->fnhe_daddr = 0;
			fnhe_flush_routes(fnhe);
			kfree_rcu(fnhe, rcu);
			break;
将这段补丁代码打入内核中,可参考netdev-leak.patch中,重新编译、安装内核。
再次执行上面的bash ref_leak_test_begin.sh和bash ref_leak_test_end.sh发现不会在打印unregister_netdevice: waiting for XXX to become free. Usage count = 1的日志。说明这段代码起作用了。
除了等待eth0这个问题,还有一个等待lo的类似问题,也有可能会出现。新版内核得到修复(v4.15),不过目前还没遇到这个问题。
另外对于pod terminating问题我们的内部环境上还没复现,个人觉得可参考ref_leak_test_begin.sh中的做法,在一个pod内向另一个pod发起大量的tcp连接请求进行测试。
参考
- https://access.redhat.com/solutions/3659011
- https://github.com/torvalds/linux/commit/ee60ad219f5c7c4fb2f047f88037770063ef785f
- https://github.com/torvalds/linux/commit/4ee806d51176ba7b8ff1efd81f271d7252e03a1d
- https://github.com/kubernetes/kubernetes/issues/64743
- https://pingcap.com/blog/try-to-fix-two-linux-kernel-bugs-while-testing-tidb-operator-in-k8s/
- https://github.com/moby/moby/issues/5618
- https://github.com/fho/docker-samba-loop